
Surefire Ways to Ensure Your DIY Project Goes Smoothly
Using an IKEA FIXA drill template to install drawer handles is a great time-saver. It makes putting together IKEA drawers in your kitchen a much easier process.
Making drill templates is something that a lot of people have a hard time doing. It’s not that it’s hard to do, it’s that we all hate to waste time.
However, if you can get a hold of a drill template that’s meant for handles for your IKEA kitchen, installing the handles gets much easier.
IKEA produces furniture items for their customers to assemble themselves.
Despite the need for self-assembly, IKEA customers don’t usually need to drill any holes in any of its furniture pieces because they come pre-drilled from the factory… except for the handles.
If you want to avoid contributing to any glaring kitchen design mistakes, we recommend using the FIXA drill template ($1.99) to help you align the drill holes on doors.
Why Design
with IKD?
Why Design with IKD?
Step by Step: How to Use the FIXA Drill Template:
1. Choose the Right Knob or Handle Style
Choose the style of knob or handle that you want to use. Hold it against your drawer or door front to ensure that it is the appropriate size and style for your drawers.
2. Decide on Ideal Placement
Place the drawer in the cabinet and then position the drawer handle on the drawer face. Remove the drawer handle when you are happy with the placement.
3. Mark the Spots on the FIXA Drill Template
Place the FIXA drill template by IKEA, over the drawer or door face. The drill template has a few holes through which you can mark the spot where you want to drill for handles or knobs.
Hold the drawer handle or knob against the template to determine its placement on the template and mark the spot with a pencil. This helps you drill holes in more than one drawer without having to take several different measurements.
4. Drill the First Drawer
Drill through the drawer face at the marked spot.
5. Use the FIXA Template to Continue Marking and Drilling
Hold the FIXA drill template against another drawer and mark the spot again with your pencil. Then, drill at the marked spot. Repeat for every drawer you have.
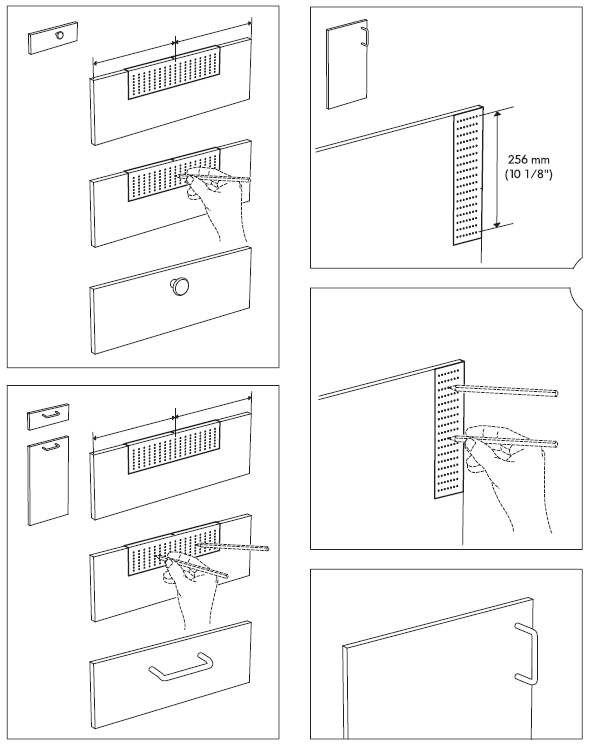
Mark the top of the handle and the other side of the handle with a pencil through the FIXA drill template. Then drill and PRESTO, you got some handles.
Tips and Reminders Before You Drill & Install IKEA Handles:
- Some IKEA handles, like LANSA, LINDSAL or VINNA may not work with the FIXA drill template. This also applies for longer handles that are from a different brand.
- Measure twice, drill once!
- The IKEA handles/pulls list the recommended drill size bit (usually 3/16″), and yes, you’ll need a traditional twist bit.
- Purchase an additional door front for testing before you commit to the handle installation process if you’re doing it yourself.
- Clamp scrap underneath holes to prevent breakout of door material. You can use a piece of wood behind the door to drill into to prevent splintering.
- NEVER use just a screw to run through the door because you will undoubtedly crack and splinter the inside of the door.
Other Installation and IKEA Kitchen Design Tips You Might Like:
Get a Professional IKEA Design For Your Home – All Online
Work with our certified designers to get a personalized IKEA design for your kitchen or any other room in your home. If you’re interested in learning more about our service, make sure to check out our IKEA Design Services.


